4.23.2010

TOPS!


Speaking of clubs, I used to belong to another group. My friend Caitee, my sister Pamela and I dubbed ourselves TOPS - not because were a bunch of dandies but (with a nod to the three-pronged Triceratops) because we considered ourselves a mighty threesome. 

To mark our entry into the pantheon of greatness, we emblazoned shirts with glittery gold lettering, a hot-pink dinosaur and baked pretzels.


Oh, pretzels. I first learned to make them during a summer camp at the John Walter Museum. At this point, I was heavy into Little House on the Prairie so days spent cooking on a wood stove, churning butter and otherwise pioneering were right up my alley. 

These pretzels were chewy and soft but it was the crunchy, coarse salt coating that won me over. I've always had a penchant for salt. When I was very young I'd pilfer pickling salt while my Mom prepared cucumbers and carrots for their brine-y fate. I had a pink, plastic, heart-shaped box to hold my stores. I liked the rough scrape of salt against my tongue. In restaurants, when I was older, I acquired the perplexing habit of tipping salt into my palm then lapping it up. My love continues unabated to this day.

So, let me practice being inclusive and share this recipe with you:


Pretzels
Thanks to the John Walter Museum

I usually use coarse pickling salt here but I imagine other large, fancy-pants salts would work as well.

1 tsp active dry yeast
3/4 cup warm water
1 tbsp granulated sugar
1/2 tsp fine salt
2 cups all-purpose flour
beaten egg
coarse salt

Preheat the oven to 425 F.

Mix the yeast and water in a bowl then add the sugar and salt. Let sit for 5 minutes, or until the yeast is bubbly. Add the flour and mix until incorporated. Knead until smooth. Shape into pretzels and place on a greased baking sheet. Brush with egg then sprinkle generously with coarse salt. Bake for 12-15 minutes, until lightly golden.

Makes about 2 dozen pretzels.

4.18.2010

My favourite pie


I used to belong to a pie club. We called ourselves PMS (which stood for Pie-Making Society) and we'd assemble, bake and impatiently wait for pie to cool at each official meeting. Over the years Jesse, Patrick, (sometimes Karl) and I made strawberry, apple, sweet potato, chocolate pecan, buttermilk and apricot pies. The best of 'em all was the rhubarb meringue pie.

Maybe it was the evening - golden, dusky light dangled in the warm summer air. Maybe it was the gin and tonics - of which, knowing us, there were quite a few. Maybe even it was the sheepishness with which we bumbled through the recipe as quickly as we could - we hoped to eat our slices and stash the rest away before our friend Andy arrived. 

Whatever it was, the pie was amazing. Rhubarb shone tartly next to rich, buttery crust and sweet, sticky meringue. It was the first time I'd had warm meringue pie and I was startled by how tremendous it was. But even that was nothing to how absolutely, breathtakingly perfect it was for breakfast the next morning - cold, straight out of the pan. I, for one, had no regrets about not sharing.


Rhubarb Meringue Pie
Adapted from How to Eat

Since Nigella hails from England this recipe is in metric. Personally, I have a scale and like measuring by weight rather than volume. If you don't have a scale, you should get one. But, if you don't have a food processor make the dough by first using your fingers, two knives or a pastry cutter to work the flour and fat together then use a fork to add the orange juice. Actually, I can't even verify the food processor technique since I delegated the pastry work to Patrick, as I am wont to do. 

For the pastry:
140g all-purpose flour
75g unsalted butter (or 35g unsalted butter and 35g lard), cold and cut into small cubes
juice of 1/2 orange, chilled
pinch of salt

Measure the flour into a bowl, add the fat and put into the freezer for 10 minutes. Put in a food processor with a double blade attached and switch on, until the mixture resembles coarse oatmeal. Add tablespoon by cautious tablespoon of chilled orange juice (to which you have added a pinch of salt) while pulsing the food processor on and off. You may need a bit more liquid than normal using this method. If you run out of orange juice, use ice water. When the dough looks like it's about to come together but hasn't actually, stop the food processor, remove the dough, roll into a ball then flatten into a thick disc. Wrap this disc in plastic and put into the freezer for 20 minutes.

Roll out the pastry fairly thinly on a floured work surface, then transfer to a pie pan. Put into the fridge for another 20 minutes. 

Preheat the oven to 400 F and place a baking sheet in the oven. Line the chilled pastry case with tinfoil or parchment paper and fill with baking weights or dried beans. Bake on the hot baking sheet for 15 minutes, then remove the foil or paper and weights. Cover the edges of the pastry with tinfoil and bake for another 10-12 minutes, until it begins to colour lightly. Remove from the oven and let cool.

For the filling:
800g rhubarb, untrimmed
juice of 1/2 orange
2 large eggs, separated
150g plus 120g granulated sugar
2 tbsp all-purpose flour
30g melted butter
1/4 tsp cream of tartar

Trim the rhubarb and chop into rough 1/2 inch pieces. If the stalks are wide, cut them in half lengthwise. Put the rhubarb in a saucepan with the orange juice and heat briefly, just to remove the rawness. Remove and drain (but save the liquid).

Mix 150g sugar with the flour and melted butter in a bowl. Beat in the egg yolks then add enough liquid from the drained rhubarb to make a smooth and runny paste. Add more orange juice if necessary. Put the rhubarb in the pastry case then pour the egg-sugar mixture over it. Bake until set, about 20-30 minutes.

Meanwhile, beat the egg whites until they form soft peaks then add 60g sugar and continue to beat until glossy. Fold in the remaining 60g sugar and the cream of tartar. Spoon this over the hot cooked rhubarb, making sure it is completely covered. Sprinkle with about 1 tsp sugar and put back in the oven for about 15 minutes, until the meringue is bronzy and brown-topped. 

Nigella says and I quoth "I like this cold. But for most tastes, eat it 10-12 minutes after it's been taken out of the oven."

Serves 6.

4.10.2010

This wittle wabbit

Easter is over and, for me, that means two things:

1. The 4th (mostly annual) Peep-Eating Contest is so close I can almost taste my (soon-to-be) victory. That and those peeps. Each time I pass by the mighty tower of Just Born chicks assembled in my bedroom I find it increasingly difficult to resist devouring them all.

2. I am inundated with a surplus of milk chocolate.

The second state of affairs is actually a bit of a problem. What, you say? Why, you say? Well, I like to hoard things. And I also prefer dark chocolate. The result is that the (milk chocolate) Easter bunny I just received from my parents is going to join the (milk chocolate) Easter bunny I received from my parents last year. Yeah.

Well, my philosophy is that when there is an overabundance - of eggs or fruit or even milk chocolate - you  should make ice cream! Here is an excellent specimen:


Milk Chocolate Ice Cream
From The Perfect Scoop

Luckily, my Easter bunnies are composed of Lindt milk chocolate. I recommend you use a similarly good-quality milk chocolate. That is to say: this ice cream will probably taste like shit if you make it with those chocolate Easter bunnies on sale at Wal-Mart, for oh, 50 cents, right now.
8 ounces (230g) milk chocolate with at least 30 percent cocoa solids, finely chopped
1 1/2 cups heavy cream
1 1/2 cups whole milk
3/4 cup granulated sugar
a big pinch of salt
4 large egg yolks
2 tsp brandy or Cognac
3/4 cup (120g) cocoa nibs, optional
Combine the milk chocolate and cream in a large, heatproof bowl set over a saucepan of simmering water. Stir until the chocolate is melted, then remove the bowl from the saucepan. Set it aside with a mesh strainer over the top.
Warm the milk, sugar, and salt in a medium saucepan until it just starts to steam. In a separate medium bowl, whisk together the egg yolks. Slowly pour the warm milk mixture into the egg yolks, whisking constantly, then scrape the warmed egg yolks back into the saucepan.
Stir the mixture constantly over medium heat with a heatproof spatula, scraping the bottom as you stir, until the mixture thickens and coats the spatula. If you have an instant-read thermometer this usually happens between 170 and 175 F. Pour the custard through the strainer into the milk chocolate mixture, add the brandy or Cognac, and mix together. Stir until cool over an ice bath.
Chill the mixture thoroughly in the refrigerator, then freeze it in your ice cream maker according to the manufacturer's instructions. During the last few minutes of churning, add the cocoa nibs, if using.

 Makes about 1 quart (1 litre).

4.02.2010

Just a mild spring zephyr


Now, have you had your fill of kale and avocados? Would you like something that isn't healthy and green and vegetarian? Do you crave sugary sweetness? Cakes of lemony lightness, tarts of chocolatey goodness? Are you scrambling to find ideas for Easter or Passover or any other holiday that springs forth this time of year?

I'm so sorry. I have nothing for you.

All I have is kale and avocados. Yesterday I brought home six bursting, black-nubbed avocados for a mere $1.39. Oh, how I was pleased. Then today, a blustery, billowy sort of day, I stopped to talk with my neighbours, you know the ones with the terrific garden? Well, the wind delivered a beating to their once-towering vegetables - most laid flat and defeated - so they sent me home with a five-foot-long stalk of Tuscan kale - roots, shoots, flowers and all.

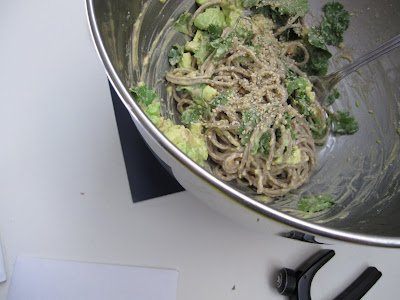
Now, I am positively giddy about all the recipes, both old and new, to use with my cavolo nero and I've got some ideas for the avocados (besides the ice cream churning as I type) but there's a problem. I can't stop making these noodles:


I first had them a couple days ago when I discovered an open package of soba noodles. Since I didn't have any radishes or bok choy or even lime juice on hand - just half an avocado and some sad, woody carrots - I decided to splice this recipe with another one I'd been eying. I roasted the carrots until they were caramelized and mostly tender (they were really old and tough), sliced them up with the avocado and tossed them with sweet potato soba noodles and a bright, orange-y  peanut sauce. It was good.

I wasn't entirely surprised when I found myself making the same thing yesterday, only with a few more tweaks here and there. No carrots, just avocado. Grapefruit instead of orange juice, sesame instead of olive oil and, just for kicks, mirin instead of water. I ransacked the cupboards for nori to no avail (I did find some kombu but, trust me, not a good substitute). Instead I sprinkled some salted sesame seeds on top - also delicious on popcorn.

How was it? The firm, earthy noodles were slick with the fantastic peanut sauce; the smooth, rich avocado  melted away and the crunchy sesame seeds provided excellent contrast. I slurped it all up. The rest of my avocados don't stand a chance.


Soba Noodles with a Citrus-y Peanut Sauce and Avocado
Adapted from Orangette

For the sauce:
1/2 cup well-stirred natural peanut butter (I use Adams 100% Natural Crunchy because I love it)
1 1/2 tsp soy sauce
1/2 cup fresh grapefruit juice
1 tbsp brown rice wine vinegar
1/2 tsp sriracha, or more to taste
1/2 tsp sambal oelek, or more to taste
2 tsp toasted sesame oil
1 tsp mirin
1/4 tsp pressed garlic (about 1 small clove)

For the noodles:
10 ounces soba noodles
2 large, ripe avocados
A couple big handfuls of fresh cilantro leaves
Salted sesame seeds, to taste

Make the sauce by combining all the ingredients in a large bowl and whisking well. Suspend disbelief and keep whisking until you have a smooth, light brown sauce. Taste and adjust as you please. Set aside.

Halve the avocados, remove their pits and gently ease them from their skins. Cut them into medium-large pieces, as you please. Set aside.

Meanwhile, bring a large pot of water to a boil then add the soba noodles. Cook them at a gentle simmer until they're al dente, about 6 or 7 minutes. Drain the noodles in a colander in the sink and immediately rinse them with cold water. Use your hands to pick up and separate the noodles between your fingers. This will prevent the noodles from clumping together.

Shake any excess water from the noodles then add them to the bowl of sauce. Using two forks, gently toss the noodles until they are evenly coated. Add the avocado and cilantro and gently toss again. Sprinkle with salted sesame seeds, to taste, and serve.

Makes enough for 4, for lunch.